-->

About Me

Masters of Science, Engineering Science at University of The Pacific, Stockton, CA.

A Computer Scientist with a goal to evolve this world- for the better through the superpower that is programming. Also a strong crypto enthusiast that believes in the power of blockchains, DeFi and NFTs. My other hobbies range from tennis, sketching, streaming videos and hiking. Here are my Socials:

LinkedIn https://www.linkedin.com/in/akshat-bajpai/
Email akshatbajpai.biz@gmail.com
GitHub https://github.com/Akbonline
My Computer Science Blog www.holymotherofpython.blogspot.com
My Hobby Science Blog www.sciecology.blogspot.com
View CV LinkedIn Profile GitHub Certificates Geek Expo Sciecology

My Projects

Latest Projects

A research project proposes a novel method for implementing an Indoor Navigation System: a monocular SLAM-based Indoor Navigation System (bib | DOI | pdf). In recent years, navigation research has expanded significantly. While outdoor navigation has reached commercial-level efficiency, indoor navigation systems (INS) still lag behind their outdoor counterparts. Outdoor systems rely primarily on GPS and inertial trackers, widely adopted since the early 2000s. Indoor navigation commonly uses Bluetooth Low Energy (BLE) beacon technology, but BLE has efficiency limitations compared to outdoor solutions. Other technologies, such as Wi-Fi, lidar, and infrared sensors, are also used for indoor navigation.

Among various approaches to implementing INS, vision-based solutions are promising for their usability and operability. Vision-based navigation aligns with how humans recognize environments by associating unique landmarks and objects. A vision-based INS typically involves a network of markers, such as QR codes, barcodes, ArUco markers, or customized patterns, scanned by users as they navigate. While this method is accurate and straightforward, it relies heavily on the availability of markers. If markers are inaccessible, locating the next one can become time-consuming and confusing. Implementing a new marker-based INS in an unfamiliar location can also be tedious.

A better approach is simultaneous localization and mapping (SLAM). SLAM is a computational process that enables a device to map an unknown environment in 3D while locating itself within it. SLAM applications include indoor cleaners, autonomous vehicles, robots, and extended reality. With advancements in mobile camera technology, both iOS and Android offer augmented reality development kits, ARKit and ARCore. However, challenges like map accuracy and storage requirements for 3D point clouds remain.

In this paper, we propose a markerless, vision-based, cost-effective, real-time solution for indoor navigation using visual SLAM. Visual SLAM's ability to operate on monocular cameras is crucial since our system uses the mobile device’s built-in camera. Advances in computer vision algorithms have demonstrated the potential of monocular visual SLAM on mobile devices. For scalability and to overcome AR SDK challenges, we use ARKit’s ARWorldMap module. ARWorldMap allows users to create location-based 3D maps, containing details such as coordinates and object identifiers.

Our Contributions

Indoor navigation systems are still evolving. This paper addresses existing limitations in vision-based systems by introducing the following features to enhance usability and operability:

  • Markerlessness: Most vision-based systems require frequent marker scanning, slowing traversal. Our system eliminates the need for markers, making it fully markerless.
  • Efficient Initial Positioning: In marker-based systems, precise placement is required to find the nearest marker, posing usability challenges. Our SLAM-based approach addresses this by simplifying initial positioning.
  • Real-time Localization: When users launch the app, the device scans the environment continuously, identifying its location by matching current image frames with the server-stored 3D map. This allows real-time localization.
  • Cost-efficiency: Modern smartphones with advanced cameras and processing capabilities eliminate the need for additional hardware. These devices now handle tasks previously requiring remote services.
  • Increased Navigation Speed: By removing marker dependency, our system provides faster, seamless navigation. The client-server pipeline is only used to exchange key points, with most computations on the device, offering speed over server-dependent systems.
  • Security and Privacy: The client-server pipeline uses TLS for localization data. The server does not store the client’s location or destination, as it sends the entire 3D map without retaining specific coordinates.

Methodology

Our system includes two main phases: (1) Generating a 3D map of the environment and (2) Localizing the device using ARWorldMap coordinates. Figure 2 illustrates the system architecture, showing interactions between mobile devices (clients) and server components that enable navigation.

Conclusions

The proposed system uses a shared server for storing and retrieving 3D maps of indoor spaces. Initially, the mobile device scans the environment using ARWorldMap, constructing a 3D map and defining shortest paths between location tags, which it uploads to the server. During navigation, the device receives the 3D map and path data, locating itself within the environment to guide users.

The main limitation is that the system requires consistency in physical structure, as changes in object color intensity can disrupt mapping. While currently limited to iOS, the Unity plugin enables cross-platform compatibility, supporting both iOS and Android. Future work includes extending the system to Android and integrating it with mature outdoor navigation systems to provide a seamless user experience.

Simultaneous Localization and Mapping (SLAM) has been there for quite a while, but it has gained much popularity with the recent advent of Autonomous Navigation and self-driving cars. SLAM is like a perception that aids a robot/device to find it's relative position in an unknown environment. Applications of which extend from augmented reality, to virtual reality, to indoor navigation, and Autonomous vehicles. 

For implementing SLAM using a perceptive device, the algorithm assumes that we have the controls of the position of the camera (6 DoF: forward, backward, up, down, left, and right). If the camera is mounted in a vehicle(that navigate on land), usually the up and down movements are minimal(and can be neglected for plain roads). The visual SLAM uses some sort of point descriptors for both generation and localization. These point descriptors can contain a camera video stream, IR readings, Li-DAR depth estimates, etc. Based on these values, the algorithm generates a map of the environment. The algorithm then makes use of Kalmann-filter algorithm, where we take observations of known values over time and try to calculate the unknown variable(dependent on the known) values. 

In our case, we have a monocular camera as a sensor that streams the video feed to the server, where the computation takes place. Based on the video feed that the server receives, various feature points are detected and a descriptor dictionary/JSON is created that stores various information that looks something like this:

Key_point = {(x,y): {'Orientation': value, "relative distance':value, 'color': value, ...}

Once this is created, we have the known variables to process the unknown variable( Reconstruction of the map). Due to the hardware limitations(ran this on a surface pro 6), the project makes use of a Sparse ORB-SLAM algorithm instead of a dense one. This doesn't compromise the efficiency(for our test case) of the algorithm by much though. Let's take a quick look at what an ORB feature mapping is...

ORB Feature Mapping:

Oriented FAST and Rotated BRIEF(ORB) is a scaling invariant, rotation invariant, one-shot feature detection algorithm. As its name suggests, it is relatively fast and doesn't require a GPU for computation. The algorithm computes the key-points of a given train image and maps it with the test image. These key-points could be the pixel intensity, edges-detected, or any other distinctive regions in an image. These key-points are then matched based on the nearest 4 pixels(as opposed to 16 nearest neighbor matching used in SURF). It also up-scales and down-scales the training image to make the feature detection scale-invariant. Due to it being computationally inexpensive in nature, this algorithm can be used in CPU and even mobile devices. When running the algorithm on our dashcam video, we get something like this:


Methodology:

The application begins with calibrating the camera and setting the camera intrinsic for optimization. It makes use of OpenCV's ORB feature mapping function for key-point extraction. Lowe's ratio test is used for mapping the key-points. Each detected key-point from the image at '(t-1)' interval is matched with a number of key-points from the 't' interval image. The key-points with the least distance are kept based on several generated. Lowe's test checks that the two distances are sufficiently different. If they are not, then the key-point is eliminated and will not be used for further calculations. For 2D video visualization, I had a couple of choices: OpenCV, SDL2, PyGame, Kivy, Matplotlib, etc.

Turns out OpenCV's imshow function might not be the best choice. It took ages for OpenCV to imshow a 720p  video with all our computations. The application made use of SDL2, matplolib, and kivy's video playing libraries but PyGame was outperformed all of them. Thus, I used PyGame for visualizing the detected keypoints and various other information such as orientation, direction, and speed.

For 3D visualization, Pangolin was the best option due to various reasons such as:
1. Supports python and it's opensource!
2. Uses simple OpenGL at its fundamental form
3. Provides Modularized 3D visualization

For implementing a graph-based non-linear error function, the project leverages the python wrapper of the G2O library. G2O is an open-source optimization library that helps reduce the Gaussian Noise from nonlinear least-squares problems such as SLAM.

 Results

The implemented algorithm provides a good framework for testing and visualizing a 3D reconstruction of the environment based on Monocular ORB-driven SLAM. Being pythonic in nature, this implementation is not suitable for Real-Time visualization.  We already have frameworks such as ORB-SLAM2 and OpenVSLAM for a c++ implementation of the algorithm. Said that, here are some demos for the algorithm:


You can find the full code here in my GitHub.
Feel free to share your thoughts by commenting, or reach me out with any queries!
Thanks for reading!!

Introduction

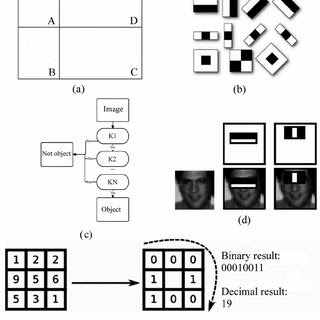
This project description contains a fun implementation of Snapchat-type, face filters, and masks using python, OpenCV, and Dlib. The basic idea behind this implementation is based on Facial landmark Detection and Tracking. This is done using the Viola-Jones Algorithm. Essentially, this algorithm recognizes the face and repeatedly scans through the spotted area, calculating the difference between the grayscale pixel values underneath the white boxes and the black boxes. For instance, the bridge of the nose is lighter than the surrounding areas on both sides.


The eye sockets are darker than the forehead and the middle of the forehead is lighter than the side of it. If the algorithm finds enough matches in one area of the image, it concludes that there is a Face there. This is what is implemented in the Haar-cascade frontal OpenCV algorithm. But in order to augment a mask on top of the face, we need to locate the exact locations of our facial feature points. This is done using a Convolutional Neural Network model trained on a custom dataset of tens of thousands of facial images with manually marked feature points annotated with it. Based on this model, we get something that looks like this:


At an initial stage, with the 67 landmarks detected, our face looks something like this:
The figure above shows the Facial landmark detected using a pre-trained dlib model. These points are now going to be used to create a mesh overlay of the face. This can now move, scale, and rotate along with our face. This is also how the face-swap feature is created. This provides us with a set of reference points to generate the desired coordinates.


Next, I figured out the size of the mask and calibrated it with the face by calculating the Face Height and width. This is done based on the landmark reference points. This step is essential for resizing the mask according to the distance between the camera and our face. The final step is to combine the two images in and produce the output that looks something like this:


The project includes 10+ masks to choose from. Here are some of the examples:


The next step is to implement 3D masks that rotate and react to our Facial movements. You can find the complete project here: https://github.com/Akbonline/Snapchat-filters-OpenCV

Feel free to share, comment, and like the post if you did! You can reach out to me through my email if you have any queries: akshatbajpai.biz@gmail.com 

Thanks for reading!

Buzzfood: Shazam for food!

The name says it all. This is an iOS application which detects the name of a cuisine in Real-time, very much like the popular Shazam application but instead of the songs, its for Food. Users can either select a picture from their gallery or they can capture it through the live feed of the camera. The idea came to me when I was watching the HBO's comedy TV series Silicon Valley. In the show, Jin Yang creates an application that can only detect if a food is Hotdog or not. So I decided to create one that detects all the foods. 


Methodology

The implementation started by searching for opensource pre-annotated datasets or pre-trained model. I couldn't find any good ones. Therefore, I decided to create my own and contribute it to the opensource community. I had a couple of options for creating and training our model: PyTorch, YOLO, TensorFlow, etc. I was looking to use the model in an iOS application. So that filtered out the options leaving me with tiny YOLO, TensorFlow lite, and CreateML. CreateML was an obvious choice.

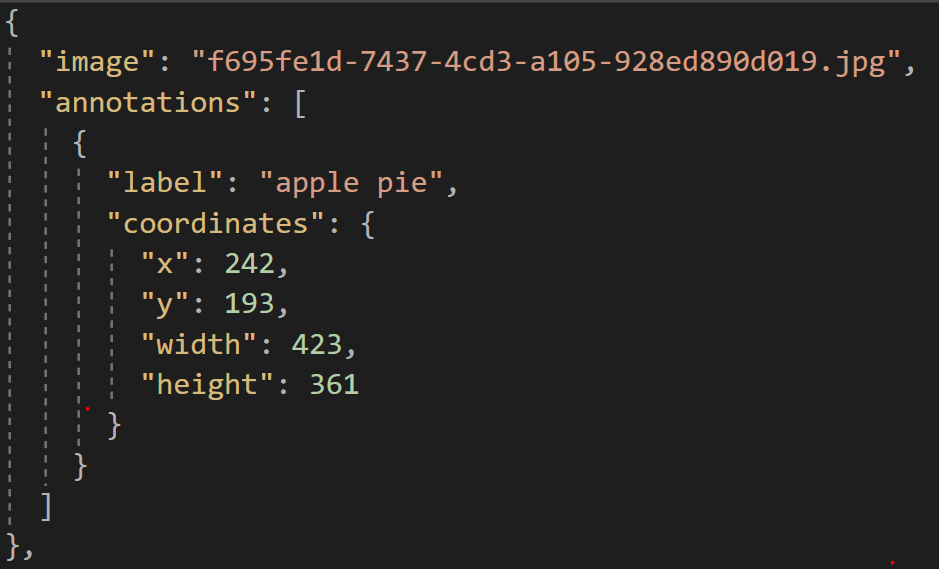
For the custom dataset, I chose IBM's cloud annotations web tool. CreateML uses the following format for annotating its datasets and building:

JSON for CreateML

Alright, lemme explain this JSON a lil bit:

    => "image": This tag contains the name of the image

        => "annotations": is a list containing all the following sub-fields:

            - "label": Contains the category of the food detected. In this case, its an image of an apple pie

                - "coordinates": is a dictionary containing:

                    > "x": the x-coordinate of where the bounding box begins

                    > "y": the y-coordinate of where the bounding box begins

                    > "width": the width of the bounding box

                    > "height": the height of the bounding box

This dataset contained 1500+ images of 25+ subclasses including: burger, pizza, bagel, rice, apple pie, doughnut, taco, calamari, sushi, etc. Using this dataset the convolutional neural network model was trained over 14000 iterations that took almost 4 days on a Macbook Pro early 2015 model(still pretty awesome). Fortunately, the results were really astonishing. 

While the model was training, I built up the UI for the iOS application. The application contains 3 views(like snapchat): Main screen, food detection on images from gallery and Real-time food detection. For the buttons, I created custom neumorphic buttons. The model is imported using CoreML and for every detections, according to the highest confidence level, detected food name is displayed. If a food is detected in the image, the background turns green with an affirming "ding" sound. If no food is detected, the background turn red with a dissapointing "dong" sound.

Demo

The finished application looks something like this:

If you found this project cool, please join me on my twitch live coding the entire project.

Thanks for reading!


Introduction

With the escalation of Deep Learning and Computer Vision, comes forth the ability to develop better autonomous vehicles. One such potential vehicular means is Drones. It's application ranges from surveillance, delivery, precision agriculture, weather forecasting, etc. This project has one such application.
Embedded with Python-based Face Recognition and Tracking, and Convolutional Neural Network, the application gives autonomous flight abilities to the Drone. There are two modes: Manual and Autonomous mode. Additional Features included are Normal, Sports, and Berserk mode for Faster Flight Speeds, Flips(Forward, Backward, Left and Right), Patrolling and Live Video Streaming, and autonomous Snapshots. 


The Drones supported for my project are DJI Tello and Tello Edu. Both of these drones have several fascinating features which makes it the perfect candidate for the drone. Such as:
  • =>Affordability
  • =>Relatively Smaller Size
  • =>Programmable with Python and Swift
  • =>Embedded Camera
  • =>Intel Processor for stable flight and turbulence reduction

fig 2. DJI Tello (on the right) and DJI Tello Edu (on the left)

The Softwares Tools and Technologies used in this project are:
  • Programming and Markup Languages: Python, HTML, CSS, 
  • IDLE and Frameworks: Flask, Ajax, Anaconda Library, Jupyter Notebook, PyCharm
  • Python Libraries: OpenCV 4, numpy, Haar cascade-xml file for Face Recognition, FFMPEG, logging, socket, Threading, sys, time, contextlib

Methodology

I started by creating a program that streams videos from the Drone to my laptop. 


fig 3. Network Backend of the Application

There are two basic network streams: A double-ended Full Duplex connection for sending and receiving commands between the laptop and the drone, and a half-duplex one-way connection from the drone to the laptop for video streaming. After establishing a stable enough connection with live streaming functionality, I used OpenCV on the video streamed from the drone for Facial Recognition. The next step was to figure out how to make the drone flight synchronous with my face's movement. I had to use Co-ordinate Geometry for achieving this. 

fig 4. Coordinate Geometry behind the Follow Algorithm
The Follow Algorithm
  1. The pixel layout of our screen starts with (0,0) and goes to the screen resolution of the display((1080,720) for HD or (3840,2160) for 4k). We make use of this to form an x-y pixel graph of the video.  
  2. In this graph, I started by drawing out a Rectangle fixed to the frame of the screen. Then, I placed a fixed point in the centroid of this rectangle. This point will be a static point of reference for other moving points on the screen.
  3. The second point, which would be dynamic in nature, would be the centroid of the rectangle containing all the faces detected in the video. 
  4. The locations of these points, relative to each other, would determine the command to be sent to the Drone. There are two basic commands that we need to send to the drone: Direction and speed of the movement.
  5. The Direction in which the drone will be flown is determined by the orientation of the dynamic point (centroid of the Rectangle enclosing the detected faces), relative to the orientation of the static point(centroid of the static Rectangle enclosing the frame).
  6. The Speed of the drone will be determined by and will be directly proportional to the distance between these two points.
    The result looked like this:
    fig 5. Implementation of the Algorithm using Python


    I then set up a local web server using Flask to provide a UI for the project. At this point, the backend was pretty much ready. Next comes creating a cool UI/UX for my application. For which, I used HTML and CSS. 

    Results

    This video shows me moving around a small room and the drone following me.

    Test 1:


     Test 2:
     
     
    The drone was able to track my face and follow me well. You can clearly see the latency but it could be overcome with better hardware. 

    Future Work

    Although the Drone-Follow algorithm works well, there are somethings that could really improve the working of the application:
    • Integrating C++ to improve latency and response time, bypassing the comparatively slow Python I/O. I've been seeing significantly improved response time using Intel's distribution of Python. I will consider using that too...
    • The DJI camera is still good enough to track the faces but there's always a scope of introducing more functionalities such as more range, better resolution, zooming capabilities, and depth sensing. 
    • Upgrading the WiFi card in the drone would certainly improve the transmission latency, especially in local networks. 
    • I'm curious to see the results when we make use of other Computer Vision libraries such as DLib or Yolo. 
    • Improved battery life for the Drone.
    Finally, you can find my project in my Github repo here.  
    I would also like to thank the awesome developers of the online video editors: EZGif and Kapwing


    Data Structures and Algorithms are two of the core Computer Science Subjects. Data Structures, as its name suggests deals with storing the data in the most efficient manner- both with respect to Space and Time Complexities. Algorithms, on the other hand, provide a step-by-step process to execute commands/instructions to achieve the desired output. From a Computer Science's perspective, any program has the following timeline:  
    'INPUT' -> 'PROCESS' -> 'OUTPUT'

    It is relatively easier for us to be aware of the 'INPUT' we provide to the program, and the 'OUTPUT' we receive from it, compared to the PROCESS part of the program. It can be a challenging experience for anyone who is trying to implement the 'PROCESS' through complex data structures and algorithms. Visualization of such concepts proves to really enhance our understanding and learning experience, by aiding us to see our code in action. This is the basis of my application: 

    AlgoWiz - 'Enhancing the understanding of complex Data Structures and Algorithms through Visualization'.

    AlgoWiz is a Multi-Platform Application that allows users to Visualize various Data Structures and  Algorithms. It has a user-friendly GUI, optimized to visualize algorithms execution on Random Trees/Graphs, for users with little or no experience, and Custom, more Complex Data Structures for intermediate and more experienced users.
    For building auto-generated Trees and Graphs, users can input the Number of Nodes and Create the Data Structure as follows:

    fig.1 Auto-Generated Tree based on the Number of Nodes

    fig.2 Auto-Generated Graph based on the Number of Nodes

    This includes implementation of the Data Structures including:

    • Singly Linked Lists: Fundamental uni-directional, linear way of storing data.
    fig.3 Singly Linked List

    • Doubly Linked Lists: Bi-directional, Linear Way of Storing data.
    fig.4 Doubly Linked List

    • Stacks: First In, First Out Data Structure.
    fig.5 Stack

    • Queues: First In, Last out Data Structure.
    fig.6 Queue

    • Trees: AlgoWiz includes Binary Tree(Binary Tree), Complete BT, Full BT, etc.
    fig.7  Binary Tree

    • Graphs: The application allows us to generate a Simple Graph, Multi-Graph, Pseudo-Graph, and Weighted Graph.
    fig.8 Weighted Graph

    The Algorithms included in the Application are:

    • In-order, Pre-order, Post-order, and Level-order Traversals: These algorithms help traverse through a tree, more specifically a Binary Tree. The basic structure of a Binary Tree node comprises of a Value, Pointer to the Right Child and, a Pointer to the Left Child.
    class Node():
        Node __init__(self, Val):
            self.right=None
            self.value=Val
            self.left=None


      • The in-order sequence of traversal follows : Left-> Root-> Right
    fig.9 In-Order Traversal

      • The pre-order sequence of traversal follows : Left-> Right-> Root
    fig.10 Pre-order Traversal


      • The post-order sequence of traversal follows: Root-> Left-> Right
    fig.11 Post-order Traversal

      • The Level order sequence of traversal follows: All the nodes in Level 0, 1, 2...,n
    fig.12 Level-Order Traversal


                           Following is the example from the application that visualizes Traversal:
    fig.13 Level-order Traversal Visualization in AlgoWiz


    • Breadth-First Search and Depth-First Search:  
              The Breadth-First Search Algorithm grows wide, layer-wise. BFS recursively looks for the element starting from the source to the neighbors in the first layer, then all the neighbors of the second layer, and so on. Below is the representation of this algorithm in a Weighted Graph Data Structure.

    fig.14 Breadth-First Search of a Weighted Graph that searches 5

    The Depth-First Search Algorithm, on the other hand, grows deep. DFS recursively looks for the element starting from the source to its neighbors, then the neighbor's neighbor, and so on.

    fig.15 Depth-First Search of a Weighted Graph that searches 5

    • Djikstra's Shortest Path:
    Djikstra's Shortest Path Algorithm finds the minimum weighted path between 2 nodes in a Weighted Graph.
    fig.16 Shortest Path Algorithm


    • Prim's and Kruskal's Minimum Spanning Tree:
    A Spanning Tree is a data structure formed from a weighted Graph by including all of its vertices, that are connected without forming a Cycle. There could be many Spanning Trees of a Graph. A Minimum Spanning Tree is one where the sum of the weights of the tree's edges is the least amongst all the spanning trees of the Graph. Given a weighted Graph, there are two main algorithms to find its Minimum Spanning Tree: Prim's and Kruskal's MST Algorithm. AlgoWiz comprises of visualization for both of these algorithms.

    Prim's Algorithm:
    fig.17 Prim's Algorithms to find Minimum Spanning Tree of the Graph
    Kruskal's Algorithm:
    • fig.18 Kruskal's Algorithms to find Minimum Spanning Tree of the Graph

    Technologies used in the Application

    The Application makes use of Python(specifically Python 3.7) programming language with the following libraries:
    • Tkinter: For the GUI Framework
    • Matplotlib, Pylab, and Networkx for Graphs and Plotting
    • IDLE: Jupyter Notebook, Visual Studio, and Visual Studio Code
    • PyInstaller for Packaging the python files together
    • Agile Methodology- Scrum and Task Boards for Project Management
    • Additional Project Management Tools: Todoist and Trello
    The Animation and Graph Integration was done through a custom-developed Algorithm with basic in-built python syntax. 

    Future Works

    All the above data structures and algorithms in the current version of the application work well. The upcoming iterations of the applications would include more advanced data structures such as Segment Trees, Red-Black Trees, Heap and algorithms for Searching, Multipath Finding, Scheduling Problems, Finding the Perfect Match, etc.
    Latency in Python programs has been a well-known limitation. This could be seen while unpacking the application, switching between windows. This is a limitation of PyInstaller. I tried using Py2exe for packaging. It showed somewhat similar results.

    Finally, you can find the project in my Github Repository linked here. Thanks for checking out my project. I would love to hear your thoughts or any feedback on the application. You can also reach me through my email-id: akshatbajpai.biz@gmail.com


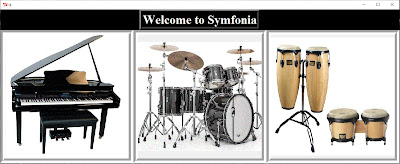
    Symfonia comprises of Musical Instruments such as Piano, Octapad/Electronic Drums/Launchpad and Bongos. With Symfonia, users can turn their keyboard and mouse into a Musical Instrument. With in-built tutorials, audio recording and various sounds/suites to choose from, Symfonia is the perfect place for a Novice Musician. The application runs on platforms including: Windows, Mac and Linux(iOS/Android versions still under progress).

    Technologies used in the application:
    • >Python 2.7
    • >Python 3
    • >kivy
    • >pygame
    • >Tkinter(in-built)
    • >Sound pack taken from Soundsnap
    Users can choose from different sound suites and also add their own sounds for a specific key or drum pad. Future Works include taking this application to a mobile platform, adding more instruments and refining the UI/UX Design. For specifically the piano Module, decresing the sound response time latency and introducing multi threading functionality to add background beats: 

    The Drum module has a set of 27 different sound packs for each pad consisting of 6 to 8 pads in a single screen:-


    The repository consists of 7 python ".py" files and 3 subfolder consisting of images, sound packs and instrument suits. Prerequisites to using the application:
    • User's system must have Python 2.7 or 3.6 
    • Pygame python module: can be installed from  here.
    • Kivy python module: can be installed from  here.
    Download the repository from  here.

    My Skill

    Being a Computer Science Major, I've gained understanding of Software Development through various Life cycle models including Agile, Prototyping, and Waterfall approach. Trying to find the right area of concentration, I've explored Augmented and VirtualReality, Internet of Things, Human-Computer Interactions, Computer Vision and Artificial Intelligence Basics. I like to classify my Programming Language Skills in the following categories:

    • Procedural Programming: Python, Java, C#, C++, C
    • Object Oriented Programming: Python, Java, C++, C#
    • Agile SDLC: Jenkins, Reviewboard, JIRA, Trello
    • Shell Programming: Unix

    Computer Vision

    Internet of Things

    Artificial Intelligence

    Augmeneted Reality

    Automation and Testing

    My Services

    What I offer

    Computer Vision

    Pose Estimation, OpenCV, Yolo, Monocular & Stereo SLAM, Object Detection & Tracking using Hough Transform, Image Classification, Lane Detection, Depth Estimation, Lucas-Kanade Feature Detection & Mapping, CUDA, Image Processing, Sobel & Canny Edge Detection, Feature Extraction using SIFT, SURF and ORB, Python, MATLAB

    Deep Learning and Neural Networks

    PyTorch, YOLO, CreateML, TensorFlow v2, Keras, Binary Classificiation, Logistic Regression, Convolutional Neural Networks, Regularization and Optimization, Hyperparameter Tuning, panda and numpy

    Internet of Things

    TCP/IP Network Stack, Client-Server Architecture, MQTT Protocol, Raspberry Pi 3, Bolt IoT, MicroPython, Arduino Uno, Mega and Nano

    Full Stack Software Development

    Even though I prefer to be a backend software developer, I'm acquainted with full-stack software development using Python, C++, C, Swift C#, Golang(GO), Java, and mySQL.

    Augmented Reality

    Unity Game Engine, Magic Leap TK, iOS ARKit, SceneKit, SwiftShot, Vuforia, Placenote, Microsoft HoloLens, Mixed Reality Toolkit.

    Project Management

    Familiar with software development life cycle models including waterfall, agile, prototype and hybrid using tools and softwares such as Jenkins, JIRA, GitHub, CI/CD, Reviewboard, Trello.

    My Experince

    Aug 2021 - Present
    Software Engineer II
    Dell Technologies

    Developing and deploying distributed system tools for PowerScale OneFS distributed networked file system, which is the basis for the Isilon scale-out Storage Platform. Participated in bug-fix cycle using JIRA, review-board, Jenkins and GitHub. Participated in Agile-based software development life cycle.

    Jul 2021 - Aug 2021
    Software Engineer
    Credence ID

    Worked on the company's proprietary codebase- Credence SDK to integrate NFIQ2 Fingerprint module for getting better fingerprints. Developed mobile application to test the C++ NFIQ2 module and retrieve fingerprint from users and provide quality score.

    Aug 2019 - May 2021
    Graduate Teaching Assistant
    University of the Pacific

    Assisted 350+ students in Data Structures, Computer Networks, Operating Systems and Database Management System Courses. Developed a data structures and algorithms visualization app that aided 100+ Graph Theory, Data Structures, and Algorithms students on-campus. The application served as an educational tool for beginners.

    May - July 2018
    AI/ Computer Vision Industrial Training
    Hewlett Packard Enterprise

    Worked on a Computer Vision based Car Parking Software Solution that identifies the registered cars, locates the nearest empty parking spot and keeps a track of any credit based payments, all with a MaestroQA score of 93.71% efficiency rate evaluated on 250+ total grades. Also got acquainted with full length Software Development Life Cycle(Agile and Prototype).

    May - July 2018
    Software Engineering Internship
    Doorastha Analytics Pvt. Ltd.

    Collaborated with both the firmware and software team managing code repositories, establishing a python-based network protocol and performed Quality Assurance and Unit Testing to maintain product efficiency. Evaluated hardware capabilities and suggested most efficient ways to connect smart meter clients with Digital Oceans server (BLE, NFC, RFID, Li-Fi, etc.), cutting cost by 15%.

    Contact Me

    Contact With Me

    Search This Blog

    Want to join the squad, Feel free to reach me out anytime! Here's my contact info: